
Prerequisites
Operation of CA services is largely tied to TLS connections, DNS addressing must be correctly configured in the infrastructure.
Virtual Machines with Keycloak, CA Gateway, and AIA/CRL services installed must have the correct names for forward and reverse DNS resolution.
To open http pages correctly, it is better to do it on the incognito page so that http does not change to https.
1. Preparing to install CA services
If you have your own PostgreSQL installation - please, ask your database administrator to provide you following information to connect to databases:
- PostgreSQL address
- database name
- user name
- user password
You will need 2 databases: for KeyCloak and for CA Core
If you plan to install a new PostgreSQL server for KeyCloak and CA Core, follow instructions bellow
1.1 PostgreSQL Installation
- installing PostgreSQL
sudo apt-get install postgresql-client-15 postgresql-15 -y
- Correction
pg_hba.conf
sudo nano /etc/postgresql/15/main/pg_hba.conf
be sure that it contains strings
# IPv4 local connections:
host    all             all             127.0.0.1/32            scram-sha-256
and
# IPv6 local connections:
host    all             all             ::1/128                 scram-sha-256
- Correction
postgresql.conf
sudo nano /etc/postgresql/15/main/postgresql.conf
change value of param standard_conforming_strings to on
- restarting service
sudo systemctl restart postgresql.service
1.2 Creating databases and users
- Connect to PostgreSQL as user
postgres
sudo -u postgres psql
- Create users and database
CREATE DATABASE keycloak;
CREATE DATABASE ca_core;

CREATE USER keycloak with password 'techpass';
CREATE USER ca_core with password 'techpass';

ALTER DATABASE keycloak SET OWNER TO 'keycloak';
ALTER DATABASE ca_core SET OWNER TO 'ca_core';
1.4 Connection test
- to test connection to
ca_coredatabase use following command
psql -U ca_core -h localhost -d ca_core -W
and provide the password
- to test connection to
keycloakdatabase use following command
psql -U keycloak -h localhost -d keycloak -W
and provide the password
1.5 Preparing to install CA services
- Creating a directory for distributions
sudo mkdir -p /opt/ca-distrib
- Unpacking the archive
sudo tar xvf st-ca.tar -C /opt/ca-distrib/
The distribution consists of 3 directories, namely: binaries, default_configs, scripts.
Binaries contains CA distributions, default_config contains default configuration files that will be used later in scripts, scripts contains scripts that we will operate with later in the instructions.
- Installing java (version 21 or later)
You can install Java-21 or later with your OS package manager (for example sudo apt install openjdk-21-jre) or manually:
- For deb
wget https://download.oracle.com/java/21/latest/jdk-21_linux-x64_bin.deb
sudo dpkg -i jdk-21_linux-x64_bin.deb
- For rpm (RedOS)
dnf install https://download.oracle.com/java/21/latest/jdk-21_linux-x64_bin.rpm
- Checking the java version
java --version
- curl installing
Install curl with your OS package manager. For example, for apt package manager is
sudo apt install -y curl
2. Launching the Discovery service
2.1 ca-eureka installing
The Discovery service is the first to be launched from the CA, as it will aggregate information about running instances.
- Running the ca-eureka installation script, the script creates the user causer (if not created), copies the jar handler script from distributions, assigns rights to the service directory, creates the ca-eureka.service service, launches it and puts it on autorun
sudo /bin/bash /opt/ca-distrib/scripts/ca-eureka.sh
- Checking the status of ca-eureka
sudo systemctl status ca-eureka.service
- In case of errors, view logs
sudo journalctl -u ca-eureka.service -f -o cat -n 500
ca-eureka http://[server_name]:8761
2.2 Setting up ca-eureka
The default location of the license file /opt/st-ca/ca-license is set in the service configuration. If the path to the license needs to be changed, then you need to change the configuration file
sudo nano /opt/st-ca/ca-eureka/application.yml
and restart the service.
sudo systemctl restart ca-eureka.service
3. CA Core installing
3.1 Installing ca-core without TLS
- Execute the script. The script requests confirmation of the full server name, then creates the user causer (if not created), creates a custom-oids configuration file, creates the directory
/opt/keycloak/conf/tls, generates the application.yml configuration file in the service directory, assigns rights to the user causer, creates the ca-core.service service, launches it and puts it on autorun.
sudo /bin/bash /opt/ca-distrib/scripts/ca-core-first.sh
- Checking the status of ca-core
sudo systemctl status ca-core.service
- In case of errors, view logs
sudo journalctl -u ca-core.service -f -o cat -n 500
- swagger http://[server_name]:9000/api/v1/swagger-ui/index.html
3.2 Converting p12 to pem and adding certificate to trusted java
After starting ca-core, a p12 file is generated, the password is specified in the configuration of ca-core
/opt/st-ca/ca-core/application.ymlin the key-password stringConvert the file to pem (we take the password from the previous paragraph)
openssl pkcs12 -in /opt/st-ca/ca-core/root-keystore.p12 -out cacert.pem -nodes
remove the excess from the cacert.pem file and leave only the certificate itself.
Adding the root certificate to the trusted ones, you must specify the full name of the server instead of $FULLNAME. The example is given for version 21.0.4, before executing the command, you need to check the installed version of java.
sudo keytool -importcert -alias $FULLNAME.root -keystore /usr/lib/jvm/jdk-21.0.4-oracle-x64/lib/security/cacerts -storepass changeit -file cacert.pem
- Type
yes
3.3 Description of the ca-core config flags
CA core flags used for the root certificate:
key algorithm: RSA, ECDSA, GOST, EDDSA
- type: RSA - The key algorithm used in generating the key pair (the available ones are listed above)
signature algorithm: SHA256withRSA,SHA384withRSA, SHA512withRSA, SHA256withECDSA,SHA384withECDSA, SHA512withECDSA, Ed25519, GOST3411_2012_256withGOST3410_2012_256, GOST3411_2012_512withGOST3410_2012_512
- sign-algorithm: SHA256withRSA - The algorithm used to generate the signature of the issued certificates (the available ones are indicated above, they must correspond to the key encryption algorithm)
size of key in case of RSA
- key-size: 4096 - Key length (used only for RSA)
key spec in case of ECDSA prime256v1, secp384r1, secp521r1
- key-spec: prime256v1 - curve name (used only for ECDSA)
storage:
PKCS12, PKCS11, JCSP
- type: PKCS12 - the type of storage used for the certificate authority key pair (the available ones are listed above)
HDIMAGE (storing the key pair in the file system when selecting JCSP), HSMDB(storing the key pair on CryptoPro HSM when choosing JCSP)
- jcspContainerType: HDIMAGE
- config-path: /opt/st-ca/ca-core/pkcs11.cfg - The path to the pkcs11 config (an example of the config is shown below)
if we want to generate key-pair on load
- generate-on-load: false - generating a key pair when starting ca-core(available values: true, false)
if generate-on-load is switched on
- dn: CN=SafeTech - The DN in the generated certificate
if pkcs12 storage-type has been chosen
- key-store-file: root-keystore.p12 - the name of p12 after generation (located on the path /opt/st-ca/ca-core/) or p12 released earlier
private key alias
- key-alias: pc-ca-30-RSA - alias of the private key
private key pass for pkcs12 or pin for PKCS11 or CP-HSM
- key-password: 12345678 - private key password or PIN code when selecting PKCS 11 or CP-HSM
Example of the pkcs11 config:
# name of the provider in JCA
name = eToken
# the path to the HSM manufacturer's library implementing the PKCS11 protocol
library = C:\pc-ca\rtPKCS11.dll
# output debugging information when connected to the HSM
showInfo = true
# the number of the slot to which the HSM is connected. If 1 is connected, then the number will be 0.
slot=0

attributes(*,CKO_PRIVATE_KEY,*) = {
  CKA_SIGN = true
  CKA_TOKEN = true
  CKA_DECRYPT = true
}

attributes(*,CKO_CERTIFICATE, *) = {
  CKA_TOKEN = true
}
4. Issuing certificates for web services
- Running the script for changing default requests and the keycloak export file to the correct server name
sudo /bin/bash /opt/ca-distrib/scripts/gen-edit.sh
- Query generation: run the commands below in turn
sudo /bin/bash /opt/ca-distrib/scripts/keycloak-gen.sh
sudo /bin/bash /opt/ca-distrib/scripts/gateway-gen.sh
sudo /bin/bash /opt/ca-distrib/scripts/web-gen.sh
- After executing each query generation command, the contents of the request appear, it must be inserted when executing the certificate issuance script (2 times - the main one and confirmation)
sudo /bin/bash /opt/ca-distrib/scripts/issue-cert.sh
If the certificate issue is completed successfully, the contents of the issued certificate will appear on the screen. Copy the contents and create files in
/home/$USER/with the names keycloak-cert.pem, gateway-cert.pem, web-cert.pem and the contents of the certificates, respectivelyPreparing
gateway.p12(setting the techpass password)
sudo openssl pkcs12 -export -out gateway.p12 -inkey gateway-privkey.pem -in gateway-cert.pem -certfile cacert.pem -name "st-ca-gateway"
- Adding the root certificate to the chain. Adding the contents of cacert.pem to the end of keycloak-cert.pem and web-cert.pem (in any text editor):
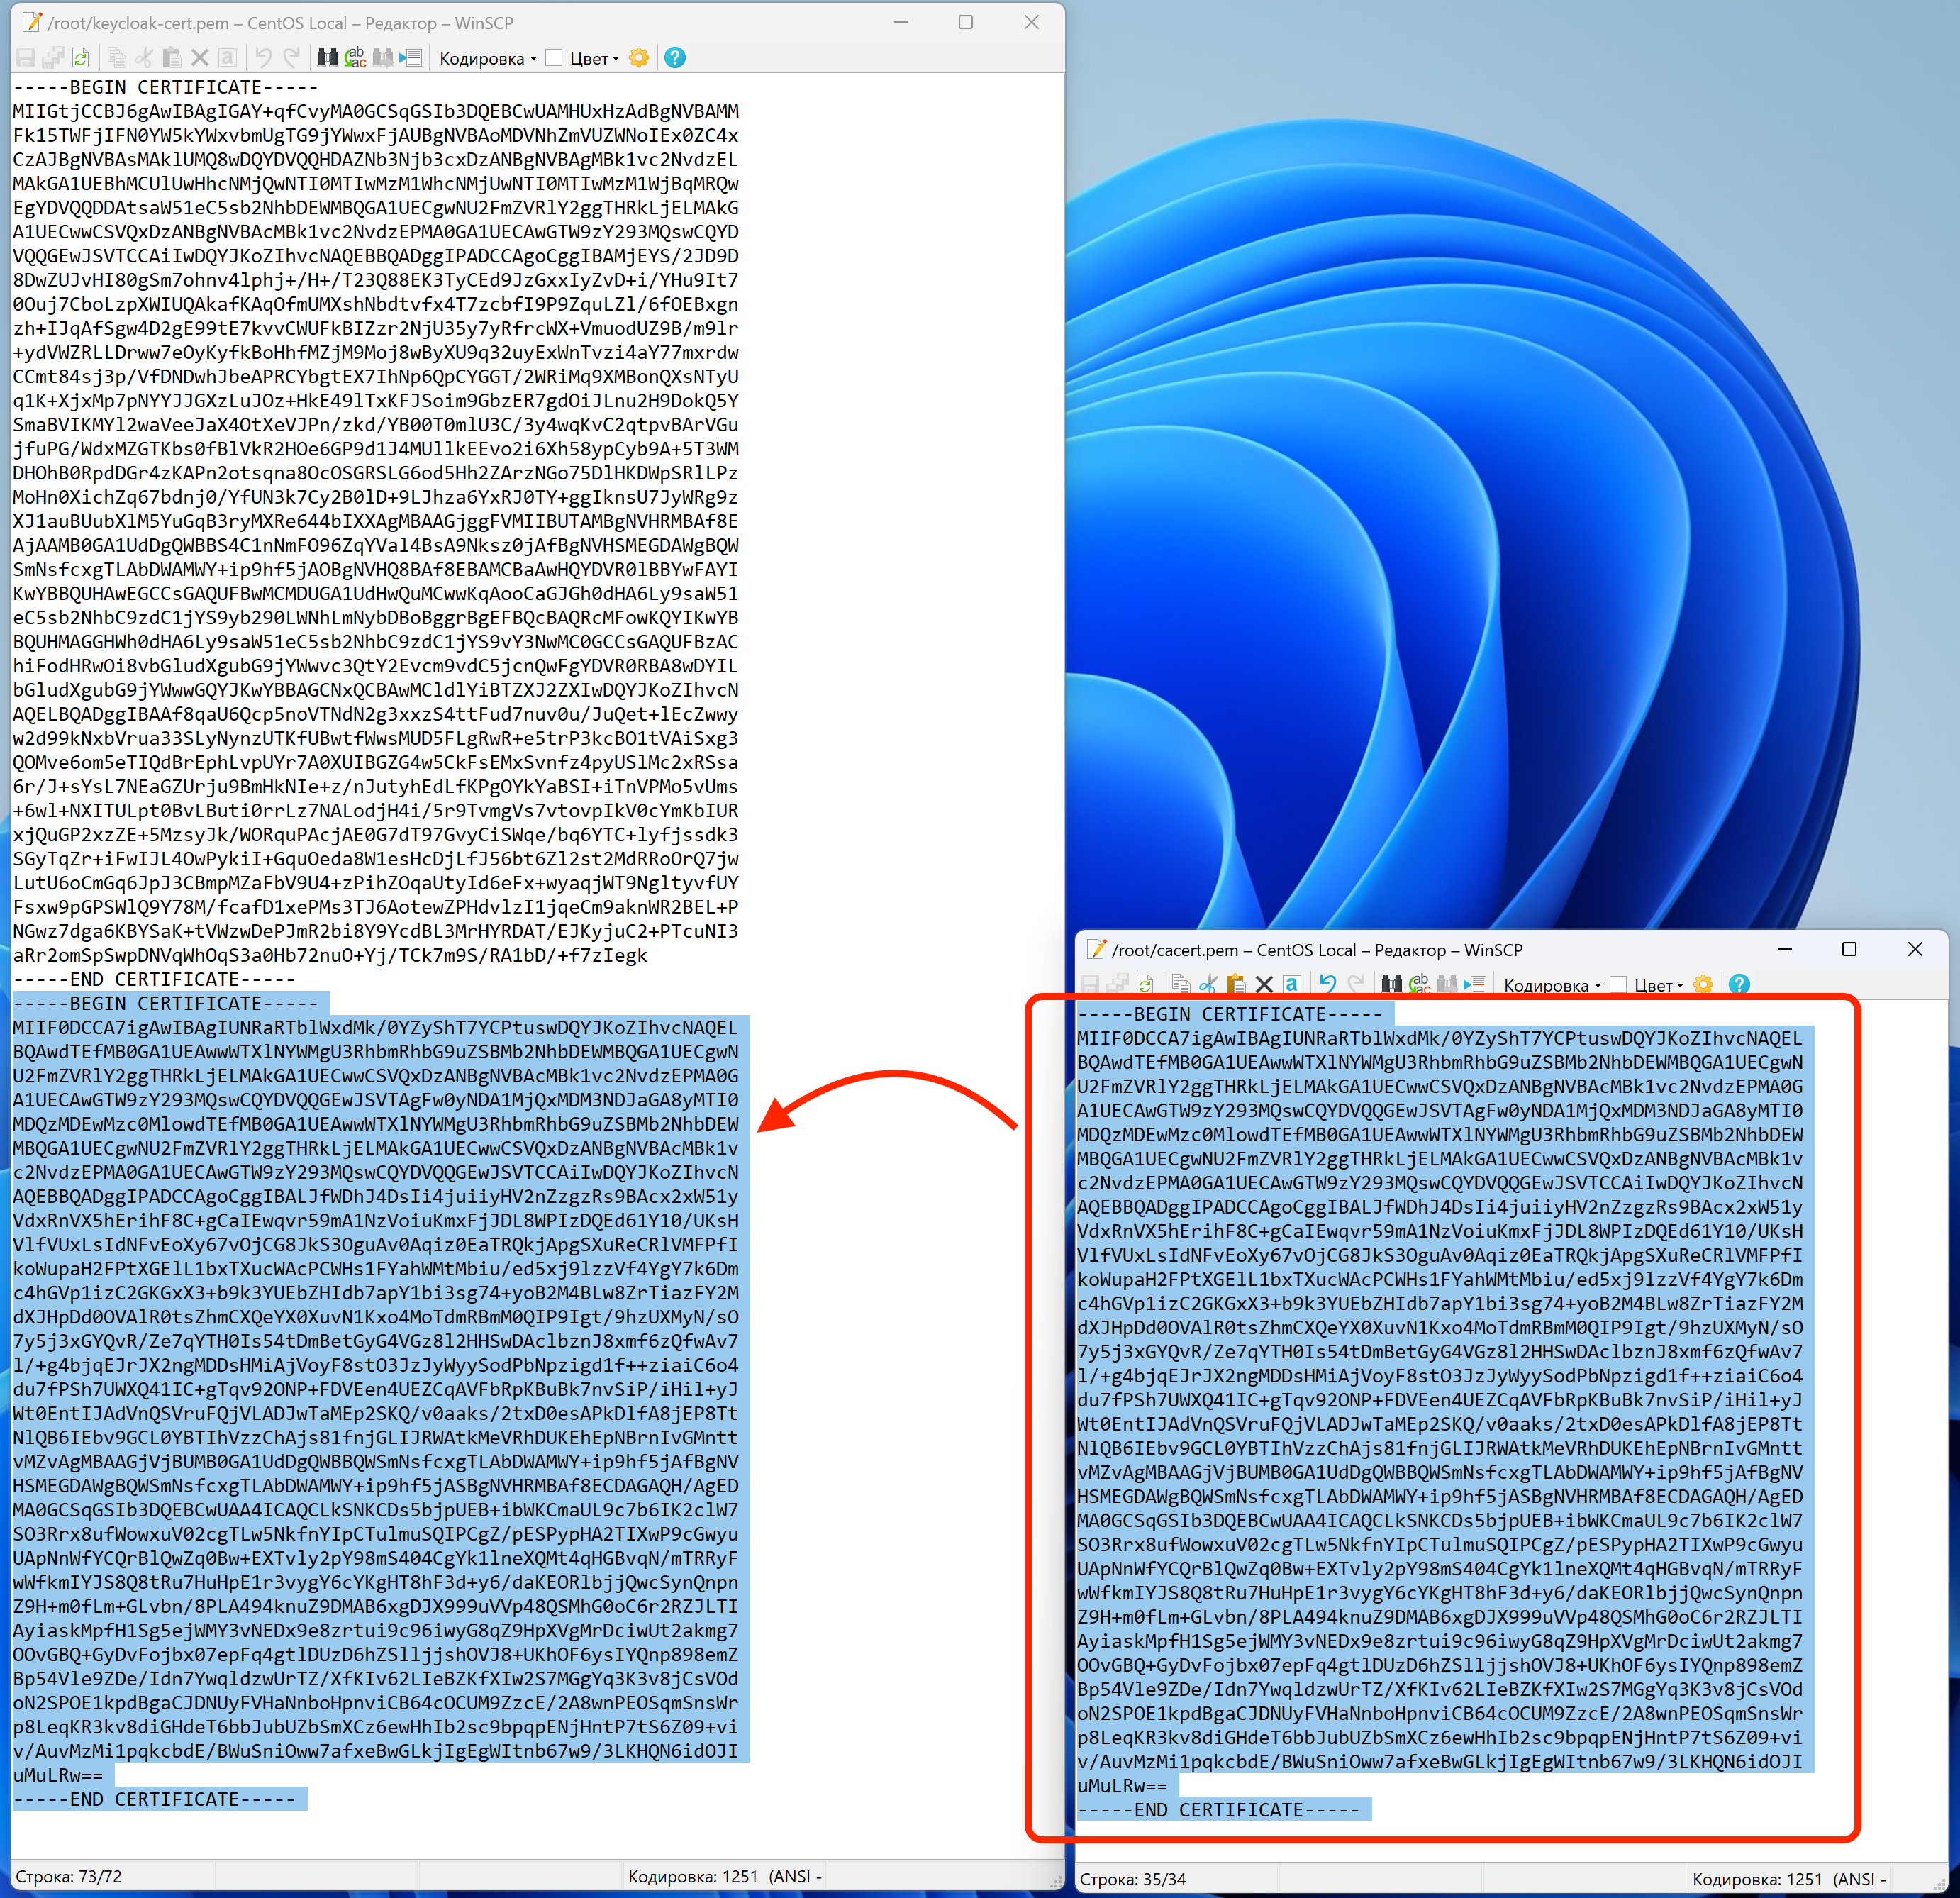
- Copy the p12 container for the ca-gateway to the desired directory
sudo mkdir -p /opt/st-ca/ca-gateway/key
sudo cp gateway.p12 /opt/st-ca/ca-gateway/key/gateway.p12
- Copy the certificate and key files for keycloak to the desired directory
sudo mkdir -p /opt/keycloak/conf/tls
sudo cp keycloak-cert.pem /opt/keycloak/conf/tls/keycloak-cert.pem
sudo cp keycloak-privkey.pem /opt/keycloak/conf/tls/keycloak-privkey.pem
sudo cp cacert.pem /opt/keycloak/conf/tls/cacert.pem
5. Keycloak installing
5.1 Downloading and unpacking
- Download the distribution TAR.GZ by the link https://www.keycloak.org/downloads
sudo wget https://github.com/keycloak/keycloak/releases/download/24.0.3/keycloak-24.0.3.tar.gz
- Unpacking
sudo tar -xvf keycloak-24.0.3.tar.gz
sudo cp -R keycloak-24.0.3/. /opt/keycloak/
- Creating a keycloak user and assigning rights to a directory
sudo groupadd keycloak
sudo useradd -g keycloak -r keycloak
sudo chown -R keycloak:keycloak /opt/keycloak
- Creating the keycloak service
sudo nano /etc/systemd/system/keycloak.service
- Service
[Unit]
Description=Keycloak Server
After=network.target postgresql.service

[Service]
User=keycloak
Group=keycloak
SuccessExitStatus=0 143
ExecStart=/opt/keycloak/bin/kc.sh start --optimized

[Install]
WantedBy=multi-user.target
- In the keycloak.conf file, uncomment the database, the user, the password (Created in pgsql), the url and fill in the hostname, specify the paths to the pem files.
sudo nano /opt/keycloak/conf/keycloak.conf
https-certificate-file=/opt/keycloak/conf/tls/keycloak-cert.pem
https-certificate-key-file=/opt/keycloak/conf/tls/keycloak-privkey.pem
- Launching build for keycloak
sudo -u keycloak /opt/keycloak/bin/kc.sh build --db=postgres
5.2 Importing the configuration and launching the service
- Importing keycloak configuration
sudo /bin/bash /opt/keycloak/bin/kc.sh import --file /opt/ca-distrib/default_configs/realm-export.json
- Launching keycloak in console mode for the initial initialization of the admin user
sudo KEYCLOAK_ADMIN=admin KEYCLOAK_ADMIN_PASSWORD=admin /opt/keycloak/bin/kc.sh start --optimized
- Launching the service and installing autorun
sudo systemctl enable keycloak.service
sudo systemctl start keycloak.service
- Checking the keycloak status
sudo systemctl status keycloak.service
- In case of errors, view logs
sudo journalctl -u keycloak.service -f -o cat -n 500
Note: if the KeyCloak configuration was imported from the realm-export file.json, then you must additionally perform the following checks: - check Valid redirect URIs for ca-gateway and ca-ui clients - change the server address to your own if invalid is specified; - for the ca-gateway client, check for "short" return addresses: for example, http://ca.demo.local:9000 /* and "short" http://ca:9000 /* - this setting is necessary for the correct operation of the CEP and CES services for MS Enrollment
5.3 Configuring Users and Roles
- opening the Administration page
https://[server_name]:8443/, login and passwordadmin move to the imported realm for CA (for example,
st-ca)creating a USER in Keycloak (a user working without a domain)
ca-standalone-admin, be sure to specify First Name, Last Name, email (any)- set a password
techpass, remove Temporary - set a role
CaAdministrator
move to the 'ca-gateway` CLIENT in Keycloak, Credentials tab and reissue Client Secret. Save it, then it will be requested in the scripts (example 7cIlQnj2NDcorxV7gzsD7Az9Q0OnZ0IK).
In the Service accounts roles tab, add the
CaAdministratorrole and therealm-management view-clients,realm-management view-clients,realm-management view-users,realm-management query-users,realm-management manage-realmroles. In the filters, select Filter by client and the desired role will be on the last page.
6. Updating the CA Core configuration
After configuring Keycloak, we can configure CA Core to work with access control functions
- To do this, run a script that will request keycloak secret from ca-gateway, specify the full name of the server, then delete the old configuration file of the service and create a new one, assign rights and restart the service
sudo /bin/bash /opt/ca-distrib/scripts/ca-core.sh
- Checking the status of ca-core
sudo systemctl status ca-core.service
- In case of errors, view logs
sudo journalctl -u ca-core.service -f -o cat -n 500
7. CA Gateway installing
The installation script requests additional information in the form of a full name, client secret from ca-gateway in keycloak, also creates a causer user (if not created), generates configuration files and services, launches them and puts them on autorun.
- Installing the ca-gateway
sudo /bin/bash /opt/ca-distrib/scripts/ca-gateway.sh
- Checking the service status
sudo systemctl status ca-gateway.service
- In case of errors, view logs
sudo journalctl -u ca-gateway.service -f -o cat -n 500
8. Installing a Web server, AIA, CDP, Web UI
Any web server can be used as a web server (for example, Apache2 or nginx).
Below is an instruction for Apache2 and HTTPD, which can be adapted for another web server.
8.1 Installing a web server
8.1.1 Installing apache2
sudo apt install apache2 -y
8.1.2 Installing httpd (for example, for RedOS)
sudo dnf install httpd -y
8.2 Web Server Configuration
8.2.1 Setting up apache2
- Creating a directory for certificates
sudo mkdir /etc/apache2/ssl
- We copy the certificate and the private key into it
sudo cp web-privkey.pem /etc/apache2/ssl/
sudo cp web-cert.pem /etc/apache2/ssl/
- Running a script that requests the server name, replaces it in the default configuration file and moves the contents of the folder
htmlto the working directory/var/www/html
sudo /bin/bash /opt/ca-distrib/scripts/web.sh
- Changing the apache2 configuration file. it is necessary to replace the path
/etc/ssl/certs/ssl-cert-snakeoil.pemin the SSLCertificateFile config with/etc/apache2/ssl/web-cert.pem, as well as the path SSLCertificateKeyFile/etc/ssl/certs/ssl-cert-snakeoil.keyto/etc/apache2/ssl/web-privkey.pem
sudo nano /etc/apache2/sites-available/default-ssl.conf
- Enabling TLS in Apache2
sudo a2enmod ssl
sudo a2ensite default-ssl.conf
sudo systemctl restart apache2
On the machine to which the connection to the CA web will be made, you need to install certificates in trusted ones, this can also be done when you first connect to the web https://[server_name]
On Linux Astra, you will need to change the configuration file apache2.conf and add the line Astra Mode off in it
sudo nano /etc/apache2/apache2.conf
8.2.2 Setting up httpd
- Creating a directory for certificates
sudo mkdir /etc/httpd/ssl
- We copy the certificate and the private key into it
sudo cp web-privkey.pem /etc/httpd/ssl/
sudo cp web-cert.pem /etc/httpd/ssl/
- Running a script that requests the server name, replaces it in the default configuration file and moves the contents of the folder
htmlto the working directory/var/www/html
sudo /bin/bash /opt/ca-distrib/scripts/web.sh
Installing TLS in httpd
sudo dnf install mod_ssl -y
In the httpd.conf file, change the following lines
sudo nano /etc/httpd/conf/httpd.conf

ServerName name_of_this_server.ru  #Uncomment the line and specify the server name
LoadModule ssl_module modules/mod_ssl.so #Add this line to the end of the configuration file
In the ssl.conf file, specify the paths to the certificate and key
sudo nano /etc/httpd/conf.d/ssl.conf

SSLCertificateFile /etc/httpd/ssl/web-cert.pem   # specify the path to the certificate (open part)
SSLCertificateKeyFile /etc/httpd/ssl/web-privkey.pem    # specify the path to the certificate (the private part)
Checking the httpd configuration
apachectl configtest
Restarting the service
sudo systemctl restart httpd.service
8.3 CRL/AIA
CRL and AIA are configured in the ca-gateway service config, the following settings are specified by default
  endpoints:
    update-interval: 600 #seconds
    use-system-hostname: true # use system hostname to build crl-dp and aia urls

  crl-dp:
    crl-file-name: st-ca.crl

    # how often to get last-published-crl from Ca-Core
    crl-update-interval: 600 #seconds

    # schedule to re-publish CRL with Ca-Core (cron-format)
    crl-republish-schedule: "0 0 */12 * * *"  # two times per day

  aia:
    cert-file-name: st-ca.crt

    # how often to renew Issuer's cert from Ca-Core
    cert-update-interval: 600 #seconds
If this needs to be changed, then edit the configuration file and restart the ca-gateway service
sudo nano /opt/st-ca/ca-gateway/application.yml
sudo systemctl restart ca-gateway.service
CRL and AIA are available at the following addresses
http://[server_name]:8080/crl-dp/crl
http://[server_name]:8080/aia/cert
In order for the links to be available, you need to add the "CaAdministrator" role in the keycloak of the ca-gateway client in the "Service accounts roles" section
9. Installing and configuring MS WSTEP (CEP / CES)
9.1 Installation of CA CEP, CA CES
- Installing ca-cep
sudo /bin/bash /opt/ca-distrib/scripts/ca-cep.sh
- Installing ca-ces
sudo /bin/bash /opt/ca-distrib/scripts/ca-ces.sh
- Checking the status of services
sudo systemctl status ca-cep.service
sudo systemctl status ca-ces.service
- In case of errors, view logs
sudo journalctl -u ca-cep.service -f -o cat -n 500
sudo journalctl -u ca-ces.service -f -o cat -n 500
9.2 Configuring Keycloak integration with a domain
If the correct DNS resolution is not configured on the server, then it is necessary to register the address of the domain controller in the hosts file on the server with services.
9.2.1 Preparing a service account in the domain
- creating a user in AD, from which 'ca-gateway
will work, for exampleca-gateway` - registering the Service Principal Name (SPN) for this user in PowerShell on behalf of the Administrator
setspn -A HTTP/[CA-Gateway-DNS-Address] [user-name]
for example,
setspn -A HTTP/o-ca-stand.loc ca-gateway
- Creating a keytab for this user
ktpass -out [user-name].keytab -princ HTTP/[CA-Gateway-DNS-Address]@[FULL-DOMAIN-NAME] -mapUser [user-name]@[FULL-DOMAIN-NAME] -pass [user-pass] -kvno 0 -ptype KRB5_NT_PRINCIPAL -crypto AES256-SHA1
For example (third-level domain),
ktpass -out ca-gateway.keytab -princ HTTP/o-ca-stand.loc@DOMAIN.O-CA-STAND.LOC -mapUser ca-gateway@DOMAIN.O-CA-STAND.LOC -pass techpass -kvno 0 -ptype KRB5_NT_PRINCIPAL -crypto AES256-SHA1
For example (second-level domain),
ktpass -out ca-gateway.keytab -princ HTTP/o-ca-stand.loc@DOMAIN.LOC -mapUser ca-gateway@DOMAIN.LOC -pass techpass -kvno 0 -ptype KRB5_NT_PRINCIPAL -crypto AES256-SHA1
Save the received keytab file - in example, ca-gateway.keytab
- enabling support for key encryption schemes for the user
AD Users & Computers -> [username] -> Properties -> Account -> markThis account supports Kerberos AES 256 bit encryption
9.2.2 Basic integration for user synchronization
In the Keycloak administration panel, perform the following actions:
- in the realm, move to the User Federation
- Add New Provider, Vendor -
Active Directory - Connection URL -
ldap://[domain-controller-dns-name](For example,ldap://o-ca-stand-dc.loc) - Click
Test Connection, check result - Bind Type -
simple - Bind DN - The DN of a user with Administrative rights (For example,
CN=Administrator,CN=Users,DC=domain,DC=o-ca-stand,DC=loc) - Bind credentials - user password
- Click
Test authentication, check result - Edit mode -
READ_ONLYfor one-way synchronization - Users DN - which group should search for users to sync with (For example,
CN=Users,DC=domain,DC=o-ca-stand,DC=loc) - Username LDAP attribute - which field should the user name be mapped to (For example,
sAMAccountName) - RDN LDAP attribute - set
cn - UUID LDAP attribute - check that the
objectGUIDis specified - leave the rest as it is
- Synchronization settings customize it for our needs
- Allow Kerberos auth - turning on
- Kerberos realm -
[FULL-DOMAIN-NAME](For example,DOMAIN.O-CA-STAND.LOC) - Server principal - the full name of the SPN registered in the step 9.1.1 (For example,
HTTP/o-ca-stand.loc@DOMAIN.O-CA-STAND.LOC) - upload the keytab file to the Keycloak server
Key tab - the location of the keytab file in the local file system (copy the keytab file there and specify the path), For example
/opt/keycloak/conf/keytab/ca-gateway.keytableave the rest as it is
The
Debugcheck mark - if problems occur, the progress of the Kerberos interaction will be displayed in the logAfter saving, go back to the realm and clear the
Kerberos principal attributefield, it will be filled in automatically after the first save
9.3 Control over the work of integration with AD
- in the browser, open the CEP URL, for example
https://o-ca-stand.loc:9001/ca-cep/(this is the address of theca-gatewayindicating the serviceca-cep) - it should be redirected to the KeyCloak login page
- enter the username and password of the Domain Administrator (or any other user logged into keycloak)
- authentication should be successful, you should be on the CEP page with an error
9.4 Role mapping
There are three roles in CA - CaAdministrator, CaOperator, CaAuditor. The role is checked when performing certain actions.
In order for a user to, for example, read a list of templates, they must have one of these roles.
To do this, you need to configure the mapping of fields from AD in the CA role.
The easiest way to do this is to create a Security Group in AD and add users there.
For this:
- open
Users and Computerson the domain controller - create a new
OU', for example,CaRoles` - create 3 new groups in it -
CaAdministrator,CaOperator,CaUser - adding the right users to the right groups (For example
AdministratorвCaAdministrator) - go to Keycloak
- User federation -> our domain -> Mappers -> Add mapper
- Mapper type:
role-ldap-mapper - LDAP Roles DN: full DN OU with roles (For example,
OU=CaRoles,DC=domain,DC=o-ca-stand,DC=loc) - Mode: You can choose
READ_ONLY - Client ID: id of the client created in Keycloak when importing the configuration (for example,
ca-gateway) - Save
- Users -> search for all users (*) -> select
administrator(domain) ->Roles mapping-> making sure that there isCaAdministrator
9.5 Setting up a certificate issuance policy for a user
- in the domain user account (for example, an Administrator), open the certificate management console
certmgr.msc - in the Personal -> Certificates tab, right-click -> Additional Actions -> Manage Policies
- add CEP address -
https://[server_name]/ca-cep/services/policy/GetPoliciesfor example,https://o-ca-stand.loc:9001/ca-cep/services/policy/GetPolicies - Click
Validate- there should be no errors - the next step is to issue a certificate for the newly added policy
Remarks
- To issue certificates via CEP/CES for users, the value
msGeneralFlagsin the template must have 0 or (according to MS doc) - 0x00000080. But the second option does not work in Win Server 2022 - The most acceptable KeyUsage for the user is - 496 (Digital Signature, Non Repudiation, Key Encipherment, Data Encipherment)
- If errors occur when adding a policy, you can analyze the logs:
- Events Viewer -> Application and Services Logs -> Microsoft -> Windows -> CAPI2 | WebServices (The Web Services log is missing in the latest versions of windows server)
journalctl -u keycloak.service -f -o cat -n 500journalctl -u ca-eureka.service -u ca-core.service -u ca-gateway.service -u ca-ces.service -u ca-cep.service -f -o cat -n 500
- Article to understand the principles of working with MS CEP/CES within the framework of AD
10. CA SCEP installing
10.1 Setting up Keycloak
- Creating a ca-scep client
- Fill in the client id and name
- In the Valid redirect URLs, specify the http server address with the port 9004 (http://[server_name]:9004/*)
- Specify client authentication, authorization, in authentication flow check the boxes on Standart flow and Direct access grants
- In the Credentials tab, generate a Client Secret, which will need to be specified during installation
- In the Service accounts roles tab, add the CaAdministrator role
10.2 ca scep installing
- ca scep installing The installation script requests additional information in the form of a full name, client secret from ca-scep in keycloak, the password of the interaction certificate container, also creates a causer user (if not created), generates configuration files and services, launches them and puts them on autorun.
sudo /bin/bash /opt/ca-distrib/scripts/ca-scep.sh
- Checking the service status
sudo systemctl status ca-scep.service
- In case of errors, view logs
sudo journalctl -u ca-scep.service -f -o cat -n 500
11. CA OCSP installing
11.1 Setting up Keycloak
- Creating a ca-ocsp client
- Fill in the client id and name
- In the Valid redirect URLs, specify the http server address with the port 9005 (http://[server_name]:9005/*)
- Specify client authentication, authorization, in authentication flow check the boxes on Standart flow and Direct access grants
- In the Credentials tab, generate a Client Secret, which will need to be specified during installation
- In the Service accounts roles tab, add the CaAuditor role
11.2 Preparation of p12
- We request an aia at http://[server_name]:8080/aia/cert . Or use cacert from the point 3.2(if the root has not changed), then, when generating p12, use cacert.pem instead of st-ca.pem
- Save it, then convert it to pem
openssl x509 -in st-ca.crt -out st-ca.pem -outform PEM
- Next, create a certificate request for ocsp
sudo /bin/bash /opt/ca-distrib/scripts/ocsp-gen.sh
- Issue the certificate either through the CA web interface or through the release script (from point 4.2, however, it will not work if keycloak authentication is enabled, that is, the instruction has been passed up to point 6 inclusive)
- Save the certificate to a file ocsp-cert.pem
- Generate p12, set the standard password
techpass:
openssl pkcs12 -export -out ocsp.p12 -inkey ocsp-privkey.pem -in ocsp-cert.pem -certfile st-ca.pem -name "OCSP"
- Create a directory for p12 and put it there, then add the rights
sudo mkdir -p /opt/st-ca/ca-ocsp/key
sudo cp ocsp.p12 /opt/st-ca/ca-ocsp/key/
sudo chown -R causer:causer /opt/st-ca/ca-ocsp/
11.3 ca ocsp installing
- ca-ocsp installing The installation script requests additional information in the form of a full name, client secret from ca-ocsp in keycloak, the password of the interaction certificate container, also creates a causer user (if not created), generates configuration files and services, launches them and puts them on autorun.
sudo /bin/bash /opt/ca-distrib/scripts/ca-ocsp.sh
- Checking the service status
sudo systemctl status ca-ocsp.service
- In case of errors, view logs
sudo journalctl -u ca-ocsp.service -f -o cat -n 500
12. Notification Sender installing
12.1 Notification Sender installing
- Installing the notification-sender The installation script creates a causer user (if not created), generates configuration files and services, launches them and puts them on autorun.
sudo /bin/bash /opt/ca-distrib/scripts/notification-sender.sh
- Checking the service status
sudo systemctl status ca-scep.service
- In case of errors, view logs
sudo journalctl -u ca-scep.service -f -o cat -n 500
12.2 Notification Sender setting up
The service is configured in the configuration file along the path /opt/st-ca/notification-sender/application.yml
The configuration file looks like this:
spring:
  application:
    name: notification-sender

  banner:
    location: classpath:/banner.txt

  mail:
    host: mail_server
    port: 587
    username: user@user.ru
    sender: user@user.ru
    password: pass
    properties:
      mail:
        smtp:
          auth: true
          starttls:
            enable: true

server:
  port: 8081


logging:
  level:
    root: info
- Where in the host you need to fill the address of the mail server
- In mail.port - the connection port
- Specify the sender in username and sender
- In password, the account password
- in server.port - the port on which the service will be raised
12.3 Mailing
The mailing lists are divided into 2 categories, the first one consists of: - Notification when issuing a certificate based on a template - Notification when revoking a certificate based on a template - Notification when the certificate expires according to the template - Pre-notification when the certificate expires soon according to the template
Setting up these Mailings is located in UI in the section "Settings" -> "Email mailings" and here you can specify who to send the message to (to a specific address or by mail from the certificate)
The second category of mailings is: - Notification of the expiration of the issuing certificate for a certain period of time - Notification of license expiration for a certain period of time
This setting is located in the configuration file /opt/st-ca/ca-core/application.yml
email-service:
  cron:
    expression: "0 13 15 * * *" # everyday at 15:13
  notification-period:
    root-cert: 30, 15, 10, 5, 1
    license: 30, 15, 1
  email:
    subject:
      root-cert: 'The root certificate will expire soon'
      license: 'The license will expire soon'
    text:
      root-cert: 'Dear administrator, the validity period of the root signing certificate is about to expire.'
      license: 'Dear administrator, the license is about to expire.'
- expression is a cron expression that defines the frequency of checking and sending notifications
- notification-period contains the number of days for which will be triggered
- subject - the title of the letter
- text - the body of the letter If these conditions are triggered, the message will be sent to the emails specified in the keycloak profiles with the CaAdministrator role
Mapping attributes from Active Directory to Keycloak
In the created User federation, go to the "Mappers" tab
Making an "Add mapper" for the necessary attributes (cn, dn, dns, email, guid, spn, upn)
When creating each mapper, you need to specify a name (you can just specify an attribute) and select "Mapper type" "user-attribute-ldap-mapper".
Next, in the "User Model Attribute" specify "guid", in "LDAP Attribute" the name of the attribute from AD "objectGUID", select the option "Always Read Value From LDAP"
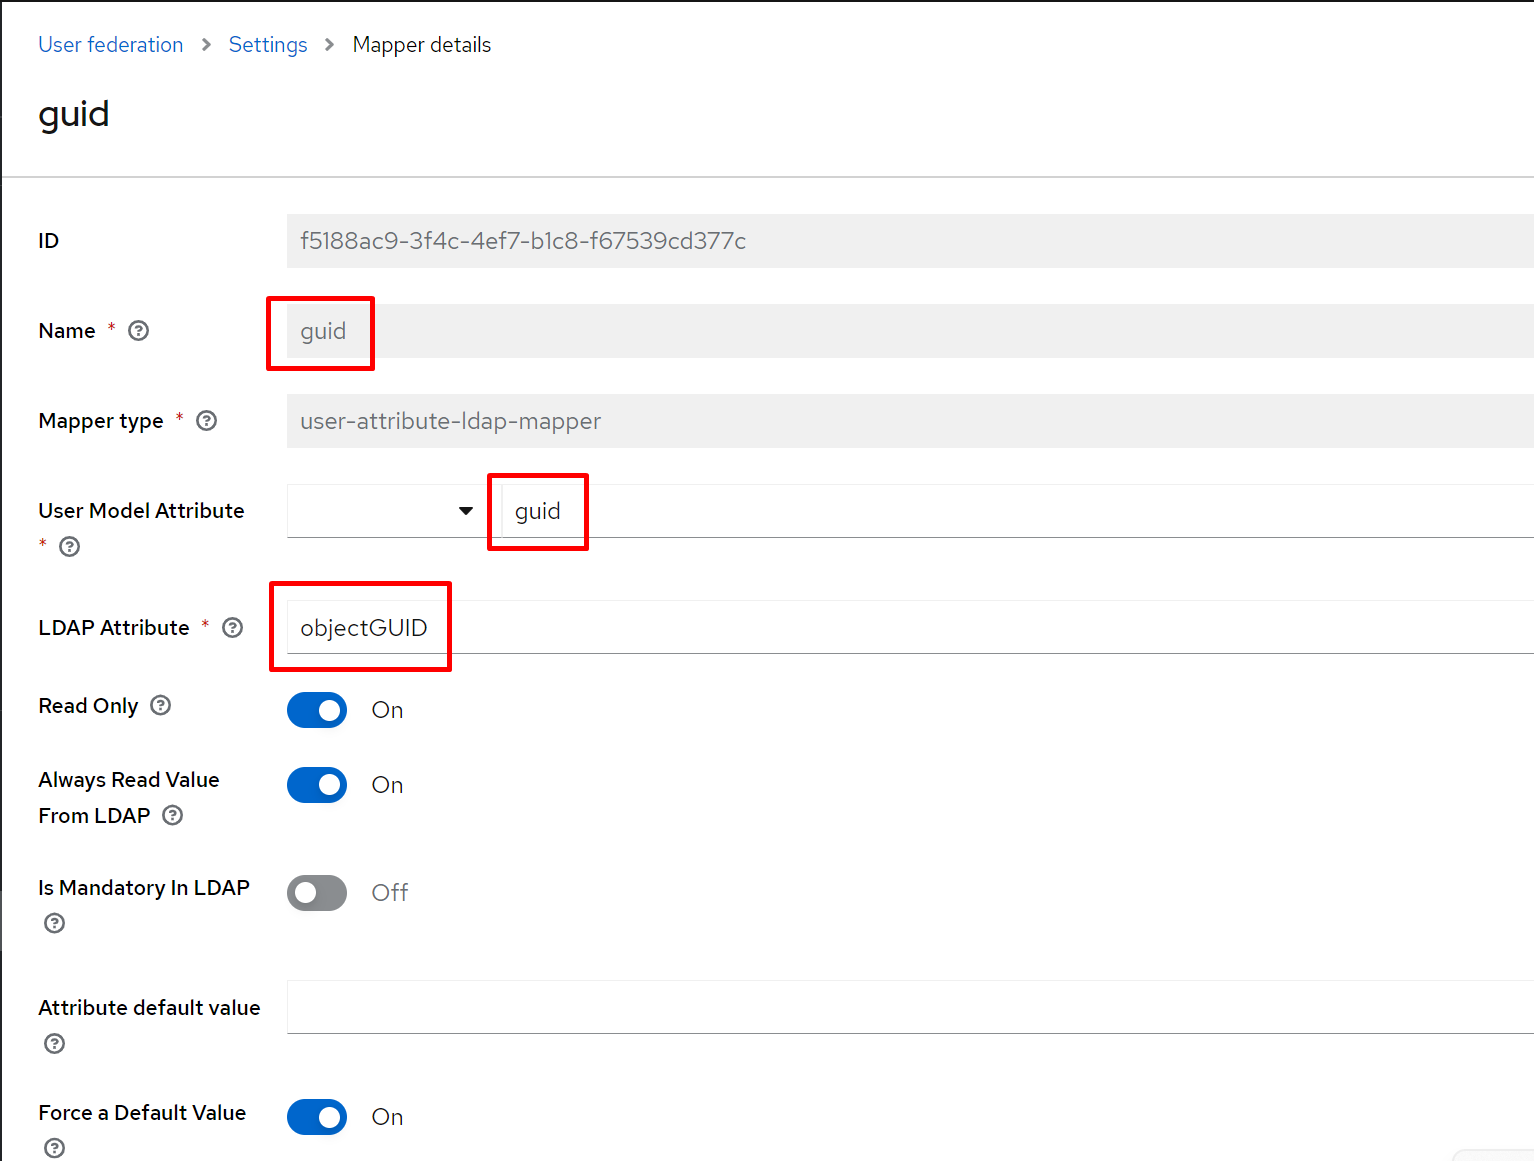
This must be done for each attribute:
cn:
- "User Model Attribute" - "cn"
- "LDAP Attribute" - "cn"
dn:
- "User Model Attribute" - "dn"
- "LDAP Attribute" - "distinguishedName"
dns:
- "User Model Attribute" - "dns"
- "LDAP Attribute" - "dNSHostName"
email:
- "User Model Attribute" - "email"(it is necessary to choose from the suggested values)
- "LDAP Attribute" - "mail"
spn:
- "User Model Attribute" - "spn"
- "LDAP Attribute" - "servicePrincipalName"
upn:
- "User Model Attribute" - "upn"
- "LDAP Attribute" - "userPrincipalName"
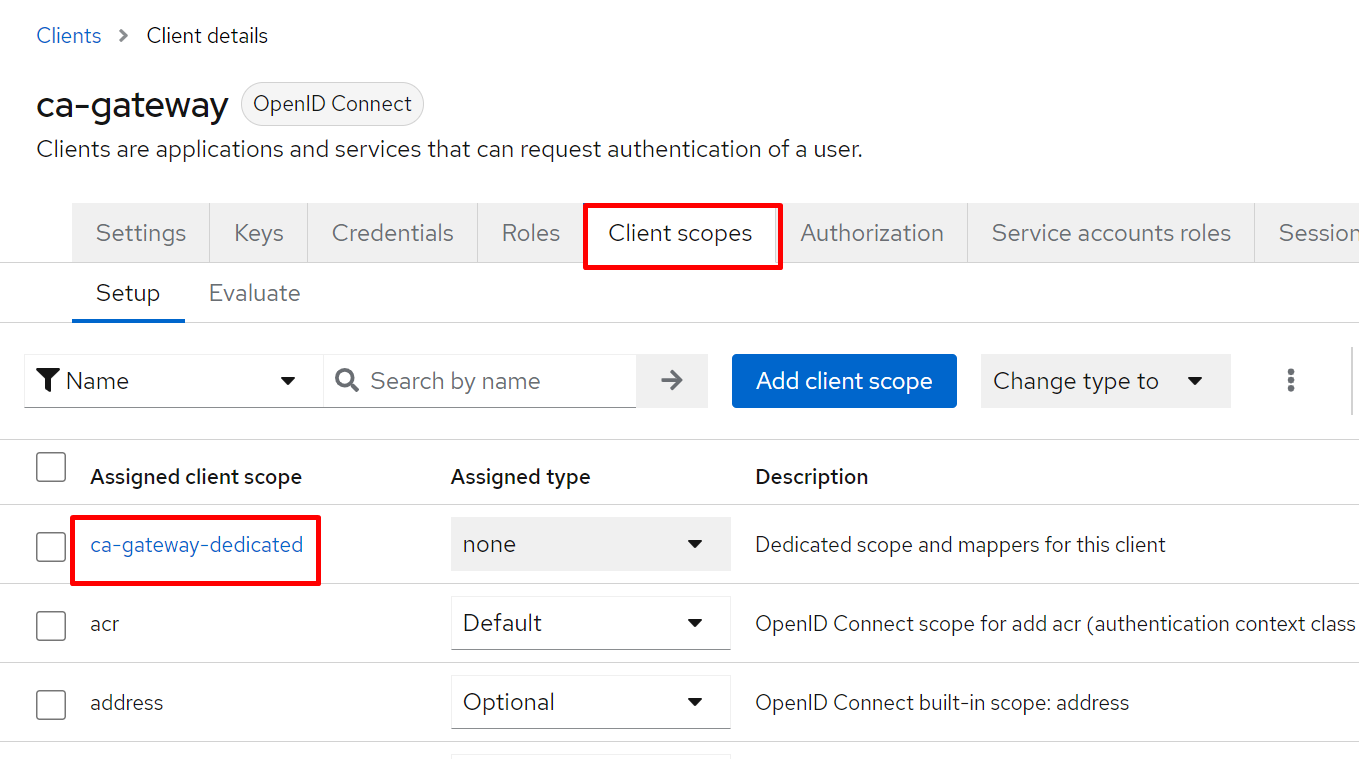
Next, go to "Clients", select "ca-gateway" and go to the "Client scopes" tab, select "ca-gateway-dedicated" there
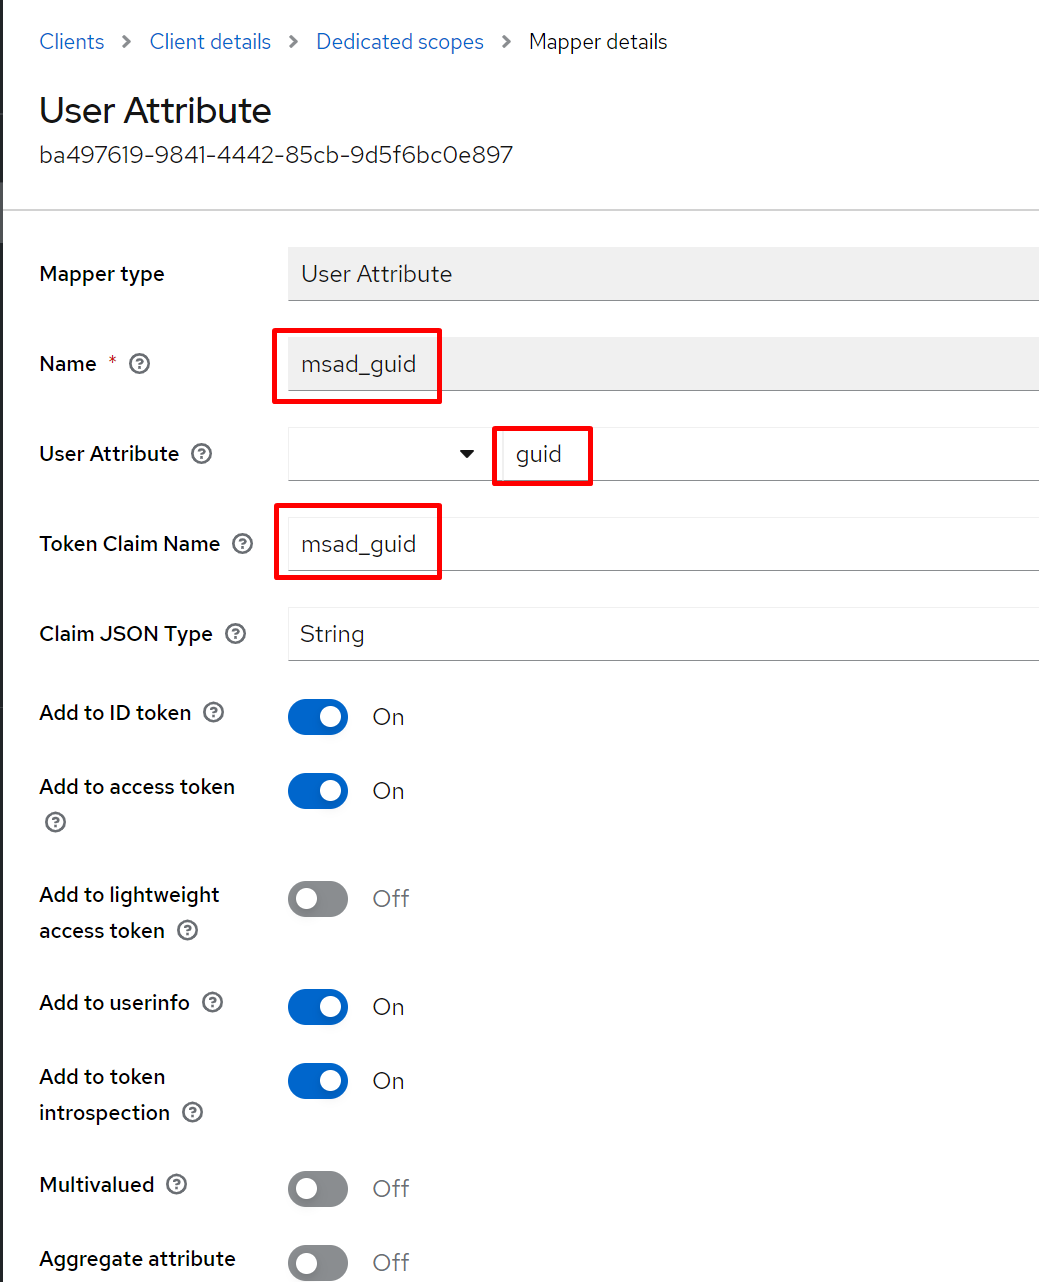
- Click "Add mapper" and choose "By configuration", in the proposed list, we need "User Attribute"
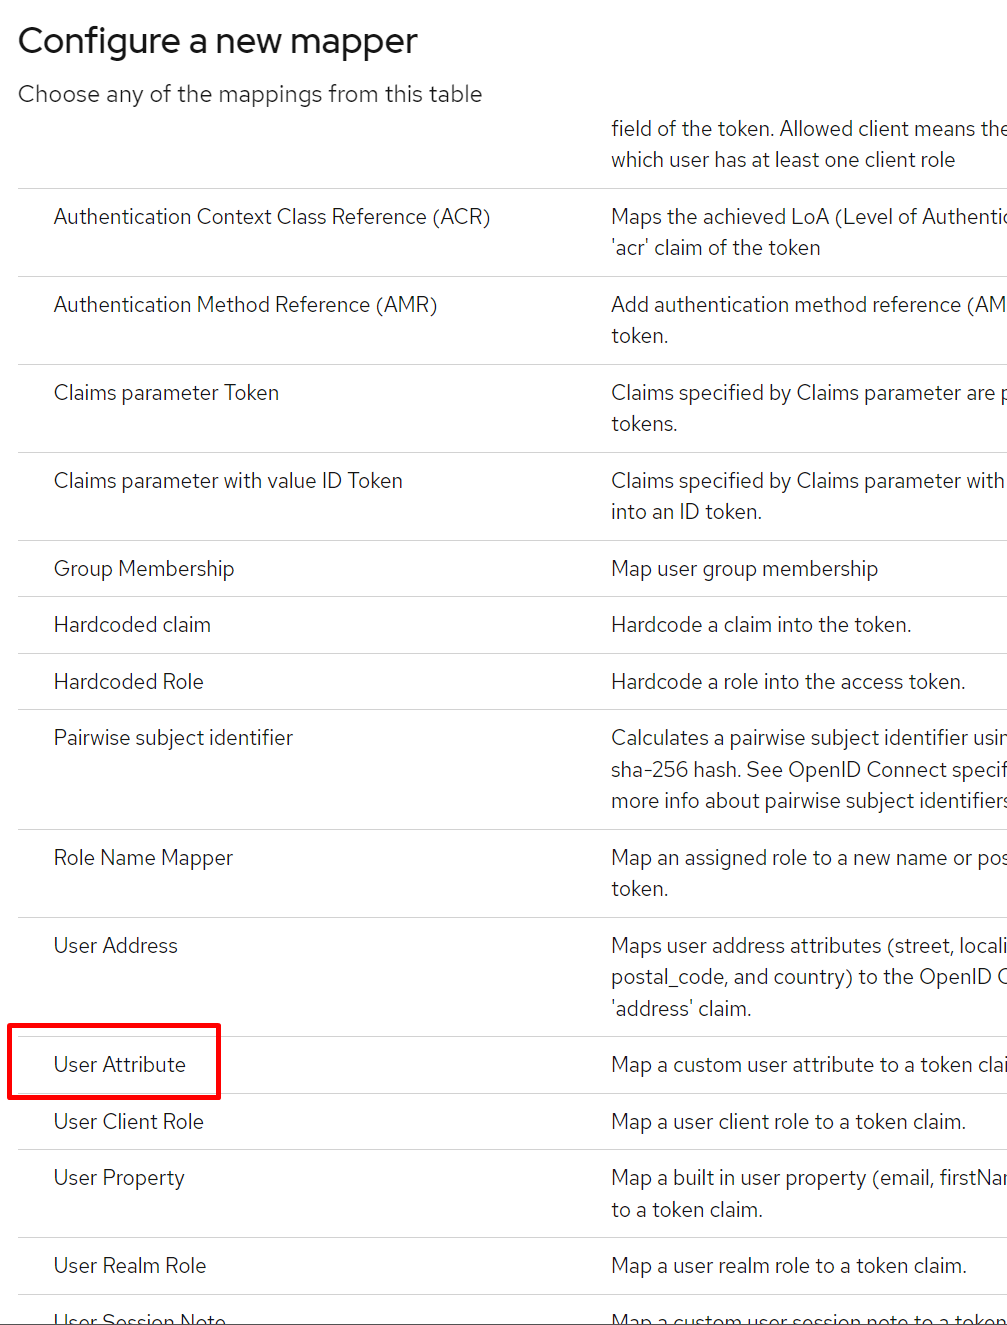
- Now fill out the card. In "Name" specify "msad_guid", in "User Attribute" "guid", in "Token Claim Name" "msad_guid"
For other attributes:
cn:
- "Name" - "msad_cn"
- "User Attribute" - "cn"
- "Token Claim Name" - "msad_cn"
dn:
- "Name" - "msad_dn"
- "User Attribute" - "dn"
- "Token Claim Name" - "msad_dn"
dns:
- "Name" - "msad_dns"
- "User Attribute" - "dns"
- "Token Claim Name" - "msad_dns"
email:
- "Name" - "msad_email"
- "User Attribute" - "email"(it is necessary to choose from the suggested values)
- "Token Claim Name" - "msad_mail"
spn:
- "Name" - "msad_spn"
- "User Attribute" - "spn"
- "Token Claim Name" - "msad_spn"
upn:
- "Name" - "msad_upn"
- "User Attribute" - "upn"
- "Token Claim Name" - "msad_upn"
After synchronization, all data in the cards will be filled in.
Creating a user federation for computers
Let's look at an example of adding computers to a domain
Creating an additional user federation
In the Keycloak administration panel, perform the following actions:
- in the realm, move to the User Federation
- Add New Provider, Vendor -
Active Directory Computers - Connection URL -
ldap://[domain-controller-dns-name](For example,ldap://o-ca-stand-dc.loc) - Click
Test Connection, check result - Bind Type -
simple - Bind DN - The DN of a user with Administrative rights (For example,
CN=Administrator,CN=Users,DC=domain,DC=o-ca-stand,DC=loc) - Bind credentials - user password
- Click
Test authentication, check result - Edit mode -
UNSYNCEDfor one-time synchronization - Users DN - which group should search for computers to sync with (For example,
CN=Computers,DC=domain,DC=o-ca-stand,DC=loc) - Username LDAP attribute - which field should the user name be mapped to (For example,
sAMAccountName) - RDN LDAP attribute - set
cn - UUID LDAP attribute - check that the
objectGUIDis specified - User object classes - set
person - Cache policy - set
NO_CACHE - leave the rest as it is
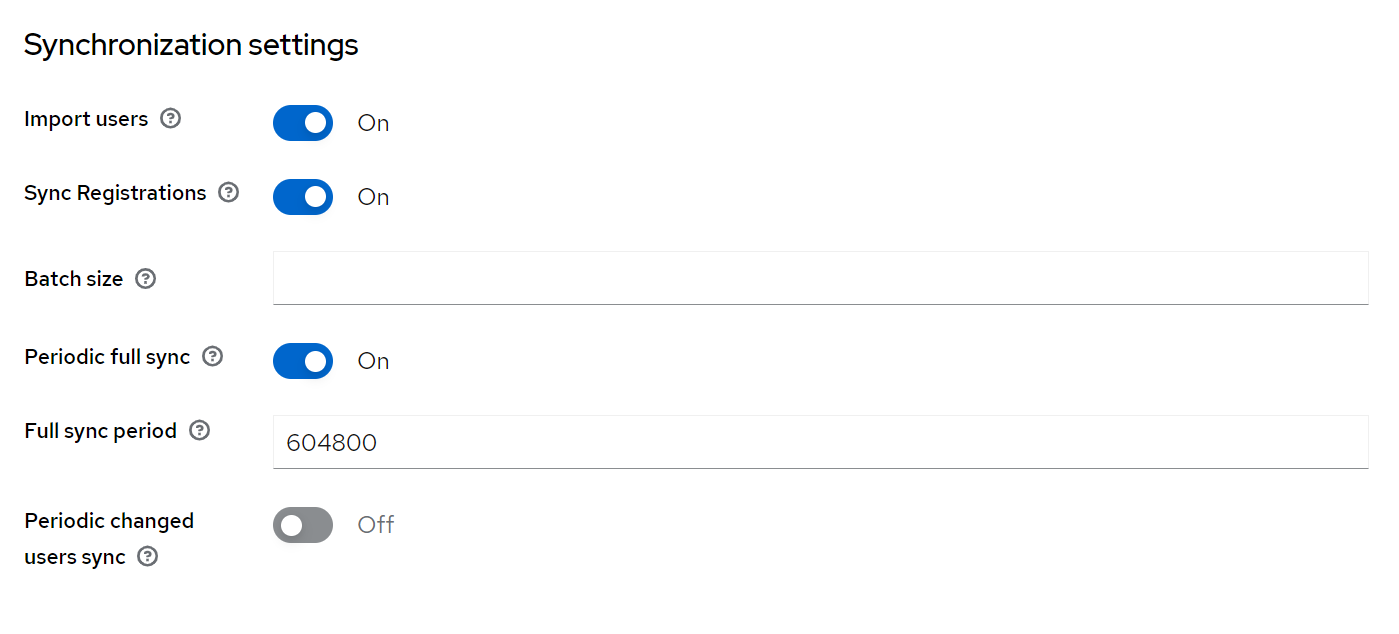
- Synchronization settings customize it for our needs
- For example:
- Allow Kerberos auth - turning on
- Kerberos realm -
[FULL-DOMAIN-NAME](For example,DOMAIN.O-CA-STAND.LOC) - Server principal - the full name of the SPN registered in the step 9.1.1 (For example,
HTTP/o-ca-stand.loc@DOMAIN.O-CA-STAND.LOC) - upload the keytab file to the Keycloak server
- Key tab - the location of the keytab file in the local file system (copy the keytab file there and specify the path), For example
/opt/keycloak/conf/keytab/ca-gateway.keytab
- leave the rest as it is
- The
Debugcheck mark - if problems occur, the progress of the Kerberos interaction will be displayed in the log - After saving, go back to the realm and clear the
Kerberos principal attributefield, it will be filled in automatically after the first save
Mapping attributes with AD
- After adding the use federation, add mappers to it, such as cn, dn, dns, email, guid, roles_mapper(Paragraph 9.4), sam, upn(an example of adding is in the instructions in the chapter "Mapping attributes from Active Directory to Keycloak")
- There is no need to map
samto the ca-gateway client, it will only be used to receive the kerberos token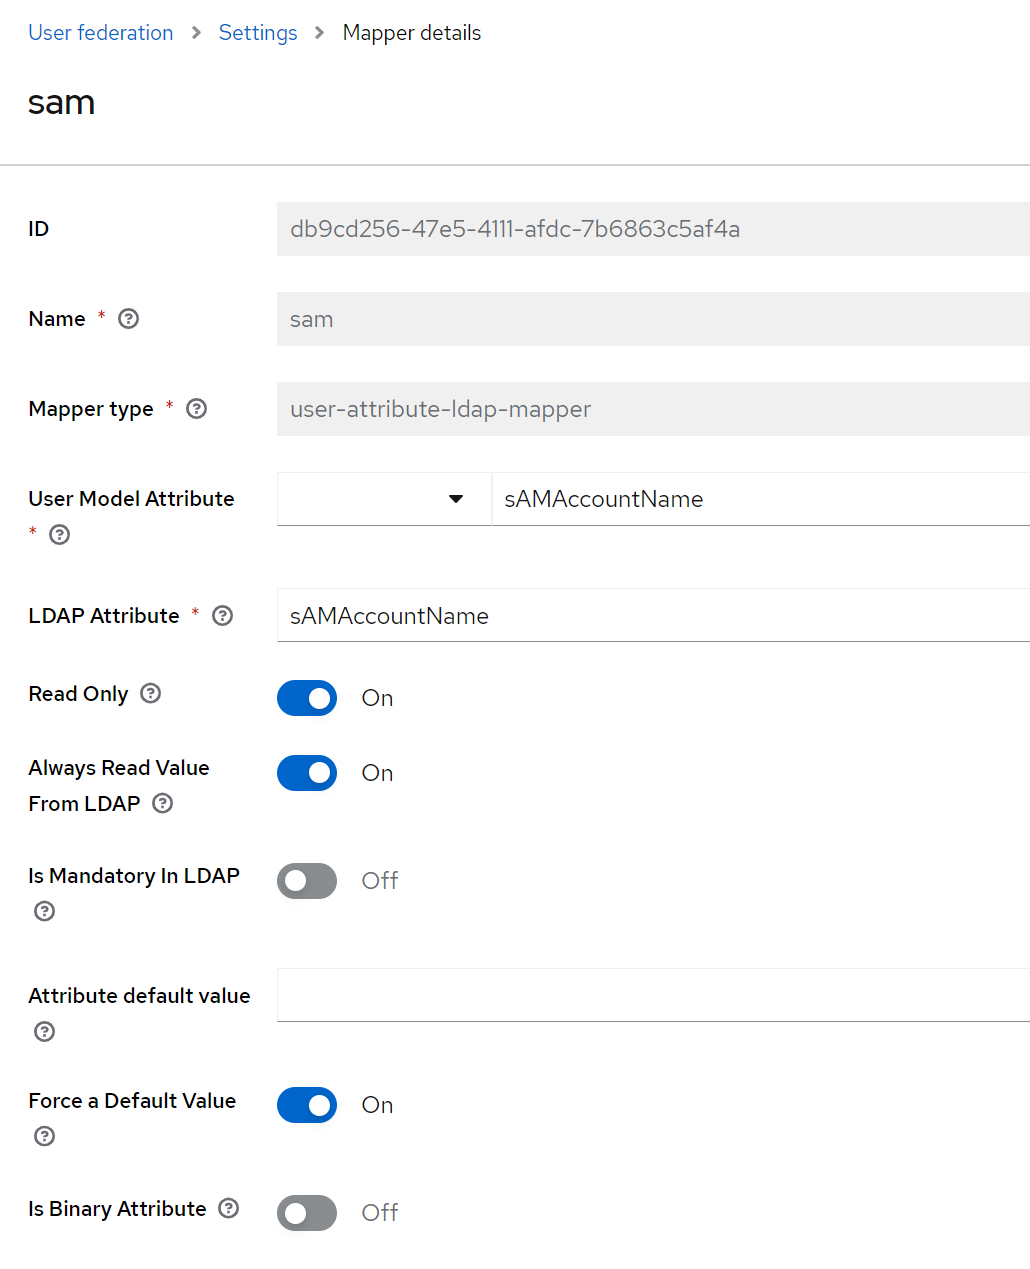
Updating modules / Installing patches
This section provides an algorithm of actions for updating ST CA modules. It is applicable in situations where it is necessary to install a patch on one of the modules or update only part of the ST CA complex, without the need for a complete reinstallation.
Updating the module
The update can be done either manually or using scripts. For manual updates, you need to: - clear the directory with previously unpacked distributions - unpack the archive with new distributions - alternately replace the jar files of the services, for example
sudo rm /opt/st-ca/ca-eureka/ca-eureka-1.0.0.jar
sudo cp /opt/ca-distrib/binaries/ca-eureka-2.0.0.jar /opt/st-ca/ca-eureka/
- after replacing the file, you need to check with the default config of the updated version and if something is missing, add it to the configuration file
application.yml. The default service configuration files are located along the path/opt/ca-distrib/default_configs/
Updating a module consists of the following typical actions: - saving the old jar file and configuration file to the /opt/temp-ca directory/* - replacing the executable jar file with an updated one from the distribution package (the ca-gateway executable file is located in the /opt/st-ca/ca-gateway directory, for other services it is the same); - updating the contents of the application.yml configuration file (the distribution package contains current examples of working configuration files); - restarting the service/daemon
Before updating, delete the content /opt/ca-distrib/*
sudo rm -rf /opt/ca-distrib/*
Then unpack the archive with the new distributions into the directory ca-distrib
sudo tar xvf st-ca.tar -C /opt/ca-distrib/
After these steps, you can start updating
updating ca-eureka
To update ca-eureka, run the command
sudo /bin/bash /opt/ca-distrib/scripts/ca-eureka.sh
updating ca-core
To update ca-core, run the command
sudo /bin/bash /opt/ca-distrib/scripts/ca-core.sh
updating ca-gateway
To update ca-gateway, run the command
sudo /bin/bash /opt/ca-distrib/scripts/ca-gateway.sh
updating ca-cep
To update ca-cep, run the command
sudo /bin/bash /opt/ca-distrib/scripts/ca-cep.sh
updating ca-ces
To update ca-ces, run the command
sudo /bin/bash /opt/ca-distrib/scripts/ca-ces.sh
updating ca-scep
To update ca-scep, run the command
sudo /bin/bash /opt/ca-distrib/scripts/ca-scep.sh
updating ca-ocsp
To update ca-ocsp, run the command
sudo /bin/bash /opt/ca-distrib/scripts/ca-ocsp.sh
Checking the operation of the services
sudo systemctl status ca-eureka.service
sudo systemctl status ca-core.service
sudo systemctl status ca-gateway.service
sudo systemctl status ca-cep.service
sudo systemctl status ca-ces.service
sudo systemctl status ca-scep.service
sudo systemctl status ca-ocsp.service
Check the logs after restarting the service, make sure that the service is running without errors: journalctl -u ca-gateway.service -f -o cat -n 500
Updating the web (ui)
Updating the web part is done by replacing the content /var/www/html. Restart the web server after the update: sudo systemctl restart apache2
sudo /bin/bash /opt/ca-distrib/scripts/web.sh
sudo systemctl restart apache2.service
To update the httpd web
sudo /bin/bash /opt/ca-distrib/scripts/web-httpd.sh
sudo systemctl restart httpd.service
License update
The license is updated by replacing the license file in the CA working directory (by default, /opt/st-ca/ca-license.json). After updating the license file, restart the services in the following order:
sudo systemctl restart ca-eureka.service
sudo systemctl restart ca-core.service
sudo systemctl restart ca-gateway.service
sudo systemctl restart ca-cep.service
sudo systemctl restart ca-ces.service
...